Saturday, November 16, 2013

Moving the Action Indoors: Amaryllis

Checked the calendar on Wednesday: just six weeks to Christmas! And that brings thoughts of one of my favorite indoor blooms...amaryllis. Of course, there are many parts of the world where amaryllis bloom naturally outdoors, and I do put my spent bulbs outside during the Spring and Summer months, but for us here in USDA Zone 7B, we have to force the bulbs to bloom "out of season" for those lovely blooms during the Holidays.

Here's a picture (right) of Red Lion blooming from last year...or, actually from earlier this year. I did not get the process going on time in the last weeks of Summer 2012, so they didn't bloom at Christmas...they bloomed at New Year's.
 
Process, you say? What process?

Many people who receive a blooming amaryllis for a gift simply toss the bulb when the blooms fade. Being the primal garbage gardener that I am, I cannot do that. I have to at least give reblooming a try. I found this great step-by-step approach from the US National Arboretum that outlines how to make it work: click here to go there.

As I said, I leave the potted (spent) bulbs, with the strappy leaves intact, outside during the warmer months. This year, I snipped off the leaves, dug them up, and brought the bulbs inside mid-September, in order to give them a good 8-week resting period. 

The bulbs spent this "time-out" in a divided box (originally made for Ball canning jars) in the guest bathroom tub (coolest place I could think of)...a room that stayed dark the entire period. There is no window in that room, and we did not turn on the light, or even enter it for the resting period.

I have been mulling over how to display them this year, wanting to do a little better than just individual plants in individual pots. I thumbed through one of my indoor gardening books, "Tabletop Gardens," by Rosemary McCreary (Storey Publishing, 2006) to get an inspiration, and then I revisited my Master Gardener Speakers Bureau binder on a presentation I gave on Containers for some ideas.

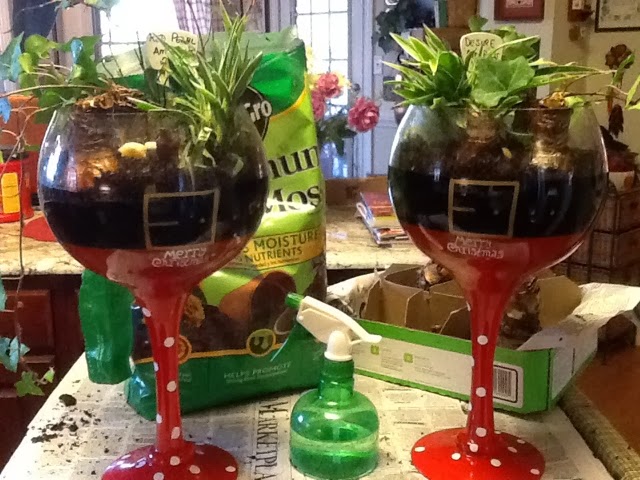
And then, during a retail therapy visit to Big Lots, I happened across these ginormous Christmas-themed wine glasses...clearly marked "FOR DECORATIVE PURPOSES ONLY." Inspiration, ideas, and opportunity all collided...and two of those 'glasses' came home with me.

My vision was to create two mirror-image tabletop container gardens for the dining room table Holiday centerpiece with three amaryllis bulbs each (they would eventually grow up to be the Thrillers), a tuft of a soft-bladed houseplant each (they would be the Fillers), and several long stems of English ivy, pulled from the over-run bed in front of our house (these would be the Spillers). I chose the wine glasses with the red and black Santa suit theme because I wanted to use as the center of this centerpiece tableau a wicker pot "cover" that is black with red accents...looks like Frosty the Snowman's top hat turned over...to contain a plain pot holding the largest amaryllis bulbs variety I have called 'Sydney.' Oh yes, Big Daddy (Sidney Lunn) is with us for every Holiday meal!

First, I gathered my materials: aquarium charcoal (acts as a filtering agent for containers that don't have drainage holes), sphagnum peat moss (a lighter planting medium than potting soil...holds moisture better), some small river rock (serves as a good 'anchor' base between the charcoal on the bottom of the glasses and the peat moss as the nesting medium for the bulbs and the companion plants) to support the emerging roots. I also got a narrow-spaded trowel and a pair of latex gloves...easier for me to work in than outdoor garden gloves. As I was working inside (too cold to work at my potting bench outside), I covered my workspace in newspaper. Meanwhile, I removed the amaryllis bulbs from their resting box to a large bowl filled with lukewarm water; I wanted to give them a good soak before planting them and get them well-hydrated after their 8-week resting period.

Gathering materials for container gardens


Then, I hand-washed and dried the containers. I placed a layer of charcoal (purchased at Petsmart, in the Fish section), followed by a layer of small river rocks. Then I scooped in a layer of peat moss. 


Unique containers for the Holidays


I first placed the Fillers (to one side of one glass container, mirroring their placement in the other container), since they had the most-developed existing root structure and needed the greatest depth of planting medium (peat moss). I added the long stems of ivy (the Spillers), pushing the root-end deep into the peat moss, adding more as needed for support/anchorage. 

Finally, I arranged three (well-hydrated) bulbs in each of the glasses and one large bulb in the single clay container. I added a bit of peat moss to cover any stray roots...but not too much. Amaryllis bulbs grow best if most of the bulb is showing. I added some larger river rocks on the top. Then I misted everything thoroughly, washing any stray planting media off the sides of the containers. 


Ready to add the amaryllis bulbs


Thrillers, Fillers, and Spillers added to containers


To finish up for the time being, I moved all containers to the warmest, sunniest window in the house...and set a light on a timer to make sure they are receiving plenty of light to stimulate bloom-growth. I will keep daily tabs and will mist as often as needed, keeping the media moist but NOT soggy. Remember, there are no drainage holes in the glass containers, and the last thing I want is to develop root-rot.

And hopefully, I'll be posting pictures soon of beautiful blooms!

Tuesday, November 12, 2013

Happening in the Garden This Week

The four-letter weather-word has shown up on our forecast for tonight: SNOW! If it happens, we will be ready for it.

One would think with the arrival of cold weather that we'd be hanging out the "Closed for the Season" sign, wouldn't one? One would be wrong! We have quite a bit of activity going on around here.

Fall Broccoli - 2013
1. The Kitchen Garden - The Third Season is in fine form out in the Box and Block Gardens. The raised beds in the Box Garden are sporting carrots (harvested the first three of the Fall last week), lettuces (3 kinds...my fave being the Red Sails), spinach (coming in fast and furious), beets (a little late here...had to replant), broccoli (pictured, right), cauliflower (replants), collards (replants), and one lone cabbage (a replant...all its friends succumbed to the dreaded cutworms, which were the cause of the replanted brassica). The Block Garden has been completely surrounded by a temporary fence (no worries...I can "open" one side of it...:-) that is supporting a good stand of (English) peas ('Wondo'...just picked some of those and popped them in our pot of soup)...and enclosing the rows where stands one lone surviving Red Cabbage plant (yes, cutworms again...you better believe I will be using cardboard collars come Spring-planting time!).

All the raised beds are sporting winter-weight row covers (purchased two years ago from Gardeners Supply...and still showing up for duty...:-), clothes-pinned to the hoops that bend over the plantings, so they should be OK down to 28 degrees. Mr. T came up with the clever idea to corral all the leaves that our neighbors are steadily gifting us with inside the fence around the Block Garden...brilliant, indeed! They provide protection to the peas...better than straw...and, of course, that lone cabbage must feel coddled, like being wrapped in a warm blanket.

We got most of the spent plant materials pulled up and into the yard waste toter, including the 5 pepper plants and the lone eggplant. Because of the high risk of overwintering of pests and pathogens on the members of the Solanaceae family (tomatoes, potatoes, peppers, eggplants, etc.), I don't compost this debris...I get it off the property. Good riddance to blights, I hope!

[By the way, I finished my latest Master Gardener article yesterday, written about the End-of-the-Season Clean-Up. Be sure to check it out here if you have the time...and LIKE and SHARE it if you are on Facebook! (If you have arrived on this post before that link is active, check back later. Thanks!)]

2. The Orchard - Granted, there isn't much activity going on amongst the fruit trees...and, since the squirrels and their pals picked all the fruit before it ripened, there wasn't much clean-up required. Still Mr. T harvested the seed pods from the zinnias and pulled up the remaining flower stalks, while I planted 6 pineapple lily bulbs (from Lakeside Farms) in the new-this-year Pollinators Garden. When the front-porch mums are finished with their blooming, I will plant them here.

I also tilled up a long bed in the back of the Way Back, across the Orchard and the Berry Patch, and planted 110 daffodil bulbs (that have been hanging out in the garage fridge for 6 weeks, as directed). They will be putting on a show, come Spring...fingers crossed; toes, too!

Seeds of the butterfly weed
Asclepias Tuberosa - 2013

We have several wonderful outcroppings of butterfly weed, Asclepias Tuberosa, in the Orchard...planted by either the birds or the wind. And, now is the time to harvest the seeds which have broken out of the pods following the recent frosty nights [shown in the picture Mr. T snapped with his iPhone (right)]. Aren't they just amazing? They are designed to be wind-dispersed, with fluffy, silky tufts. We'll keep them in a paper bag in the garage fridge until Spring, then plant...and cross our fingers and toes because butterfly weed is notoriously difficult to grow from seed. We shall see...

3. The Berry Patch - All is quiet on this tasty front. Mr. T has filled the blueberry boxes 3 (raised beds, containing the 9 blueberry bushes) with bags and bags of our neighbors' shredded (mostly oak) leaves...remember, blueberries love an acid soil and oak leaves can help maintain that. I also tilled up and refurbed another strawberry bed, this one containing the newest Ozark Beauty runners. (No snakes were found this time!)

4. The Rose Garden - All of the hybrid teas, the grandifloras, and most of the David Austen ("English" shrub) roses are winding down, forming as many rose hips as rose buds. The two notable exceptions are the coppery 'Pat Austen' and the lemony 'Molineaux.' So, when you look toward the Rose Garden from another part of the Way Back, you will see the colors of Fall: orange and yellow. Beautiful combination!

Additionally, the 'Mardi Gras' floribunda rose bush (located just outside of the Rose Garden, in the Rondel) is still budding, producing the flamboyant pinks, oranges, and yellows...all swirled together into colorful blooms. Makes for fabulous bouquets, especially when you add the prolifically-producing 'Gethsemane Moonlight' mums that now dot several corners of the property. I pruned the original 6 plants after their first growth spurt in the Spring, in order to assure lush flower production in the Fall...then dipped the "prunings" into rooting hormone...lo and behold, WORLDS of new plants. Gotta love propagation!!

The rest of our weekend activity revolved around general cleaning up and taking relaxing breaks in the swings. Since it has been a difficult week around our house, we needed some time for rest and contemplation.

And the garden is the very best place for it.  Happy hoeing!